
Pre-Application Checklist
#As of 2026, applying for an Indonesian visa involves a structured process managed by the Directorate General of Immigration (Ditjen Imigrasi). Before proceeding with your application, it’s key to understand the specific visa category you need, gather the required documents, and ensure you meet all eligibility criteria.
Choosing the Right Visa Category
Indonesia offers various visa categories depending on your purpose of visit. It's essential to select the appropriate category to avoid delays or rejections. - Tourist Visa (B211A): Suitable for leisure visits. E Visa Tourist
- Visa on Arrival (VOA): Available for short-term stays, typically for tourists. Visa On Arrival
- Limited Stay Permit (KITAS): Used for work, study, or family reunification. Kitas Work
- Digital Nomad Visa: Ideal for remote workers planning to stay longer. Digital Nomad
Important: Ensure you choose the correct visa type according to your planned activities in Indonesia to avoid complications.
Gathering Required Documents
To support your visa application, you must gather a set of required documents as outlined by the Directorate General of Immigration. - Valid passport with at least six months remaining validity
- Recent passport-sized photographs
- Proof of travel itinerary or return ticket
- Financial proof, such as bank statements or income certificates
- Specific documents based on visa type, such as employment letters for work permits
Tip: Verify the specific document requirements for your chosen visa category on the official Directorate General of Immigration website.
Checking Visa Eligibility Criteria
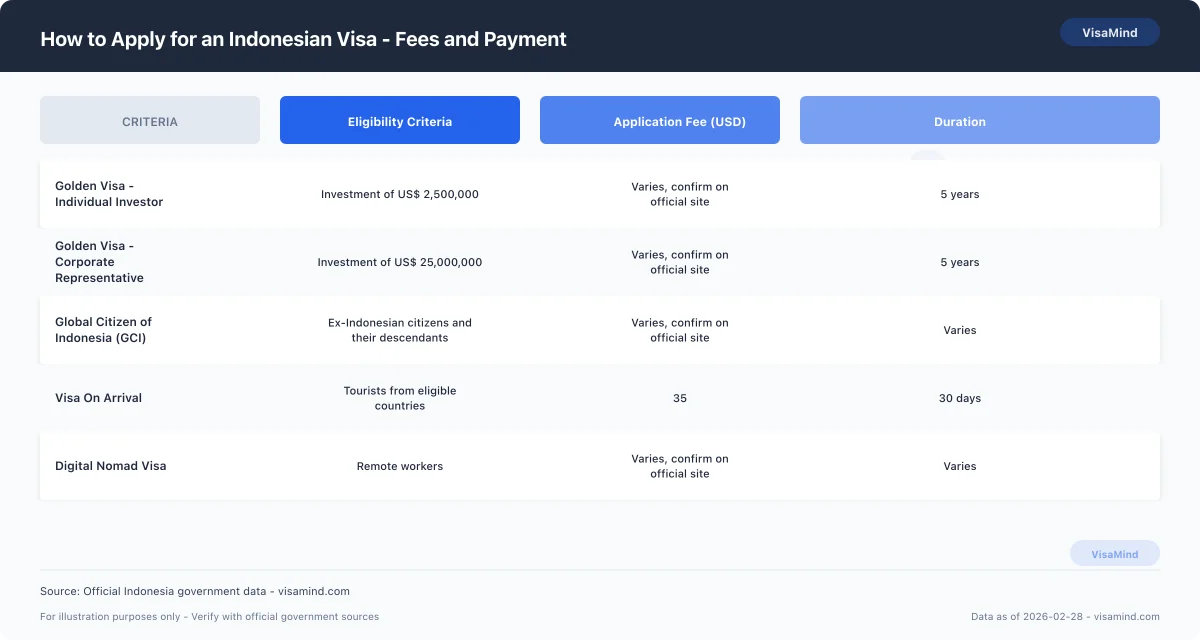
Before applying, confirm that you meet all eligibility requirements for your chosen visa type. - GCI Visa: For former Indonesian citizens or those with special skills. Golden Visa
Warning: Not providing adequate proof of income or investment can lead to visa application denial.
Application Costs
#
Visa application fees in Indonesia can vary significantly depending on the type of visa you are applying for. The Directorate General of Immigration (Ditjen Imigrasi) manages these applications and sets the fee structure.
Indonesian Visa Application Fees
Fees for Indonesian visas depend on the visa type. For instance, the e-Visa Tourist (B211A) and Visa on Arrival (VOA) have different cost structures.
| Visa Type | Fee (IDR) |
|---|---|
| e-Visa Tourist (B211A) | Rp 2,000,000 |
| Visa on Arrival (VOA) | Rp 500,000 |
| Golden Visa | Varies based on investment |
Tip: Always check the latest fees on the Directorate General of Immigration website before applying.
Accepted Payment Methods for Visa The Directorate
General of Immigration accepts several payment methods for visa applications. These include online payment systems and traditional bank transfers. - SIMPONI payment system
- Credit or debit cards
- Bank transfers
Important: Ensure your payment method is accepted by checking the specific requirements for your visa type, such as the e-Visa Tourist or Visa on Arrival.
Refund Policy for Visa Applications
Refunds for visa applications in Indonesia are generally not available once the application process has begun. The fees paid are considered processing fees.
Warning: If payment issues arise, contact the Directorate General of Immigration immediately to resolve the matter.
Your Biometrics Appointment
#Indonesia requires biometric data from visa applicants to enhance security and streamline the application process. This is typically done through appointments at VFS centers or embassies.
VFS Centers in Indonesia VFS
Global manages several centers across Indonesia where you can complete your biometrics requirement. These centers are located in major cities like Jakarta, Surabaya, and Bali. - Jakarta - Kuningan City Mall
- Surabaya - Lenmarc Mall
- Bali - Beachwalk Shopping Center
Tip: It's advisable to book your appointment at a VFS center at least one week in advance to ensure availability.
Embassy Appointments for Biometrics
Alternatively, you can schedule a biometrics appointment at the nearest Indonesian embassy or consulate if a VFS center is not accessible. This option might be suitable for those living outside major cities.
-
Locate the nearest Indonesian embassy via the official website.
-
Contact the embassy to schedule an appointment.
-
Ensure you have all required documents for the appointment.
Important: Embassy appointments may have longer wait times, so plan accordingly.
Biometric Data Collection Process
During your appointment, VFS or embassy staff will collect your fingerprints and take a digital photograph. This process is quick, typically taking less than 15 minutes. - Fingerprints collected using a digital scanner
- Digital photograph taken
- Verification of identity documents
Warning: Failure to provide accurate biometric data may result in delays or denial of your visa application.
If Something Goes Wrong
#In 2026, Indonesia processed over 9 million visa applications through the Directorate General of Immigration (Ditjen Imigrasi). While the majority of these applications are successful, some face setbacks. Understanding your options if your application is denied is necessary.
Understanding Appeal Rights
If your Indonesian visa application is refused, you might have the right to appeal. However, appeal rights are not universally granted for all visa types. The appeal process generally involves submitting additional documentation or evidence to support your case.
Important: It's important to check the specific appeal procedures for the visa type you applied for, as these can vary. Refer to the official guidance provided by the Directorate General of Immigration for accurate information. - Identify the reason for refusal
- Gather additional supporting documents
- Submit an appeal within the allowed timeframe
Reapplication Process After Rejection
If your appeal is unsuccessful or not applicable, you can reapply for the visa. Reapplying involves addressing the reasons for the initial refusal effectively. Ensure all required documents are accurate and complete.
-
Review the rejection notice to understand the reasons for denial.
-
Collect missing or additional documents as needed.
-
Lodge a fresh application through the official E Visa Tourist or Visa On Arrival portals, if applicable.
Tip: Consult the Visa Refusal Reasons guide to better understand common issues and how to address them in your new application.
Administrative Review Procedures
An administrative review is a procedural step to ensure that the visa decision was made correctly. It is not a full appeal but rather a review of the decision-making process to check for any errors.
-
Request an administrative review with the Directorate General of Immigration.
-
Provide any additional information that might support your case.
-
Await the outcome, which could take several weeks.
Warning: Administrative reviews do not guarantee a different outcome. Prepare your documentation thoroughly before requesting one.
Which System to Use
#The Directorate General of Immigration (Ditjen Imigrasi) in Indonesia manages the visa application process through its official online portal. This system is streamlined to facilitate the application for various visa types, including the Golden Visa and GCI.
Accessing the Indonesian Visa Portal
To start your visa application, you need to visit the official website of the Directorate General of Immigration. This portal is the central hub for all visa-related services in Indonesia.
-
Open your web browser and navigate to the Directorate General of Immigration's official site.
-
Look for the 'Visa Services' section on the homepage.
-
Click on the link to access the visa application portal.
Tip: Ensure that your web browser is updated for the best experience when accessing the visa portal.
Important: Make sure you have all required documents ready before starting your application to avoid delays.
Visa Application Portal
Once logged in, the portal provides a user-friendly interface to guide you through the visa application process. Each step is clearly outlined, from document submission to payment.
-
Select the type of visa you wish to apply for.
-
Upload necessary documents as per the visa requirements.
-
Proceed to the payment section to pay the visa fee using SIMPONI or a credit/debit card.
Warning: Failure to upload all required documents can result in application delays or denial.
Expected Timeline
#The processing time for an Indonesian visa application can vary considerably based on the visa type and individual circumstances. The Directorate General of Immigration (Ditjen Imigrasi) aims to process most applications within a few weeks.
Visual Timeline of Visa Process 1. Gather required documents
- Submit visa application online through the official Directorate General of Immigration website
- Pay visa fee via SIMPONI or credit/debit card
- Receive application review and decision
- Download approved visa
Tip: For more information on specific visa types, visit the Kitas Work and Digital Nomad Visa pages.
Estimated Processing
Times for Indonesian visas generally range from 5 to 15 business days. However, it is advisable to apply well in advance to accommodate any potential delays.
Important: Check the Processing Times guide for the most current estimates.
Document Preparation:
Ensure all required documents are gathered according to the type of visa you are applying for. - Submission: Applications are submitted online, and fees are paid through approved payment methods. - Approval Notification: You will receive a notification once your application is processed and approved. - Visa Download: Approved visas can be downloaded from the official website.
| Milestone | Typical Duration |
|---|---|
| Document Preparation | Varies |
| Online Submission | Immediate |
| Review and Decision | 5-15 business days |
| Visa Download | Immediate after approval |
How to Submit Your Application
#Every year, thousands of individuals apply for visas to enter Indonesia through the Directorate General of Immigration (DGIM). The process involves multiple steps and requires careful attention to detail. Understanding the specific procedures, such as filling out the application and submitting necessary documents, can streamline your experience. Here, we provide a detailed overview of the application steps to help you process efficiently.
Filling Out the Visa Application
- Visit the official Directorate General of Immigration website to access the visa application portal.
2.3. Fill in your personal details accurately, ensuring that they match your supporting documents.
Important: Ensure that you have a stable internet connection when filling out your application online to avoid any interruptions.
Submitting Required Documents
Once your application form is complete, you will need to gather and upload the necessary documents. These include proof of income, investment commitment, or other visa-specific requirements. - Proof of income (for Golden Visa and GCI applicants)
- Investment documentation
- Valid passport
- Recent passport-sized photographs
Tip: Double-check all uploaded documents for clarity and resolution to prevent any delays in processing.
Completing the Application Process
-
Review all entered information and uploaded documents for accuracy.
-
Proceed to the payment section and pay the visa fee using SIMPONI or a credit/debit card. Fees are displayed in IDR (Rp).
-
Submit your application and note down the application reference number for future tracking.
Important: Keep a copy of the payment receipt as proof of transaction until your visa process is complete. After submission, monitor your email for updates from the DGIM. Once approved, you can download your visa online and prepare for your travel. For those interested, additional information on Limited Stay Permit - Work (KITAS) and Digital Nomad Visa is available.
Tracking Your Application
#The Directorate General of Immigration (Ditjen Imigrasi) offers online tools to track your Indonesian visa application status. This feature ensures you can monitor the progress and receive updates efficiently.
Using Visa Tracking Tools
After submitting your visa application, you can track its status through the official Directorate General of Immigration website. This tool provides real-time updates on your application's progress. - Visit the official Directorate General of Immigration website. - Navigate to the 'Visa Tracking' section. - Enter your application number and personal details as required.
Tip: Keep your application number handy for quick access to status updates.
Understanding Processing Timelines
Visa processing times can vary based on the type of visa and the completeness of your application. Generally, applications are processed within 5 to 10 working days.
Important: Verify current processing timelines on the official website as they may change.
Next Steps While Awaiting Approval
While waiting for your visa approval, ensure that all your travel documents are in order. This includes your passport and any other required documents for entry into Indonesia. - Review your travel itinerary and ensure all bookings are confirmed. - Prepare any additional documentation that may be required at the point of entry. - Stay informed about any changes to entry requirements or travel advisories.
Important: Consider reading the Visa Refusal Reasons guide to understand potential pitfalls in the application process.
Booking Your Appointment
#VFS Global is the authorized partner for lodging Indonesian visa applications in many regions. It is important to schedule an appointment to submit your biometrics and supporting documents.
Scheduling Appointments with VFS Global
To apply for an Indonesian visa, scheduling an appointment with VFS Global is necessary. This ensures that your biometrics and documents are processed efficiently.
-
Visit the VFS Global website and select the 'Indonesia' tab to begin the appointment process.
-
Choose your visa type and complete the online application form.
-
Select an appointment date and time that suits your schedule.
-
Confirm your appointment and note the details for your records.
Tip: Schedule your appointment well in advance, as slots can fill up quickly, especially during peak travel seasons.
Steps to Book Your Biometrics
Biometric data collection is a mandatory part of the Indonesian visa application process.
-
Log into your VFS Global account and select 'Biometrics Appointment'.
-
Enter your application reference number and personal details.
-
Select a convenient location for your biometrics appointment.
-
Receive a confirmation email with your appointment details.
Important: Ensure you arrive at your biometrics appointment with all required documents to avoid delays.
Required Documents for Appointment
Having the correct documents ready ensures a smooth appointment process. - A valid passport with at least six months of validity remaining. - A printed copy of your appointment confirmation email. - Completed application forms as required. - Proof of payment of visa fees, which can be made via SIMPONI or credit/debit card.
Warning: Failure to bring all required documents may result in your application being delayed or rejected.