
Pre-Application Checklist
#Before you can embark on your journey to Thailand, it's crucial to ensure you meet all the necessary requirements for a Thai visa application. The first step in the process is to choose the appropriate visa category based on your purpose of travel. The Thai e-Visa system, managed by the Ministry of Foreign Affairs of the Kingdom of Thailand, allows you to apply for various types of visas, including the Tourist Visa (TR) and Non-Immigrant Visa B (Business/Work), online without the need to visit a Thai Embassy or Consulate.
Choosing the Right Visa Category
Selecting the correct visa category is essential. Here are some common options:
- Tourist Visa (TR): For leisure and tourism purposes.
- Non-Immigrant Visa B (Business/Work): For business activities or employment.
- Non-Immigrant Visa ED (Education): For study or educational programs.
- Smart Visa: For highly skilled professionals and entrepreneurs.
Tip: Review the detailed requirements for each visa type on the Immigration Bureau's website to verify your eligibility.
Gathering Required Information and Documents
Once you've determined the appropriate visa category, you'll need to gather the necessary information and documents. This includes:
- Passport: Ensure your passport is valid for at least six months beyond your planned entry date into Thailand.
- Supporting Documents: Depending on the visa type, this may include proof of financial means, employment verification, or educational enrollment.
- Application Information: Personal details, travel itinerary, and purpose of visit.
Refer to the Documents Checklist for a comprehensive list of what you'll need.
Checking Eligibility
Before you proceed with the application, confirm that you meet the eligibility requirements:
- You must be outside of Thailand at the time of application.
- Ensure your passport and supporting documents are ready to be presented at the Royal Thai Embassy or Consulate-General if needed.
- Verify that you can upload all necessary documents online.
Important: Submitting an application while you are in Thailand or failing to upload all required documents can result in delays or rejection.
Creating an Account and Preparing to Apply
To apply through the Thai e-Visa system, you must first create an account on the official website. Once registered, you'll be able to start your application process by:
-
Filling in the online application form.
-
Uploading the required documents.
-
Paying the visa fee.
Ensure you have a stable internet connection and scanned copies of all documents ready for upload.
By carefully preparing and verifying these steps, you can increase your chances of a successful Thai visa application. For further guidance, explore related resources like the Visa Refusal Reasons to avoid common pitfalls.
How to Submit Your Application
#Create an Account on the Thai e-Visa Website
To begin your application for a Thai visa, you need to establish an account on the Thai e-Visa platform. This official portal, managed by the Ministry of Foreign Affairs of the Kingdom of Thailand, allows you to apply for various visa types such as the Tourist Visa and the Non-Immigrant Visa B (Business/Work). Ensure that all the information you provide during registration is accurate and matches your official documents.
Complete the Online Application Form
Once your account is set up, proceed to fill out the online application form. This form requires detailed personal information, travel history, and the purpose of your visit to Thailand. Be sure to review the instructions for your specific visa category before starting the form. For instance, requirements for a Non-Immigrant Visa ED (Education) may differ from those for a Smart Visa.
Tip: Pay close attention to each section and double-check your entries to avoid errors that could delay processing.
Gather and Upload Required Supporting Documents
Different visa categories require different supporting documents. Commonly needed documents include a valid passport, recent photographs, and proof of financial capability. You might also need documents like an acceptance letter from a Thai educational institution for an education visa. Refer to this Documents Checklist for comprehensive guidance on what you need. Ensure all uploads meet the specified size and format requirements.
Important: Failure to upload all required documents can result in application delays or rejections.
Pay the Visa Fee
After successfully uploading your documents, the next step is to pay the visa fee. This payment is typically made online through the e-Visa platform. Fees vary depending on the type of visa you are applying for, so verify the exact amount on the website. Save the payment confirmation as proof of transaction.
Await Processing and Receive Confirmation
Once you've submitted your application and payment, the processing begins. The processing time can vary, so check the Processing Times for updates. You will receive an email confirmation once your e-Visa is processed. This document is crucial for your entry into Thailand, so keep it safe and readily accessible.
Tip: Submitting your application well before your intended travel date can help avoid last-minute stress.
Present Your Documents at the Royal Thai Embassy/Consulate-General
In some cases, you may be required to present your passport and supporting documents in person at a Royal Thai Embassy or Consulate-General. Make sure to verify if this step is necessary for your visa type and plan accordingly.
By following these steps carefully, you can efficiently navigate the process of applying for a Thai visa. For more guidance on specific visa types, explore our detailed articles on visas like the Non-Immigrant O and Visa Exemption.
Application Costs
#
Thailand's visa application costs can vary significantly depending on the type of visa you are applying for. It is important to be aware of these costs upfront to ensure you are prepared to cover all necessary expenses.
What Are the Application Fees?
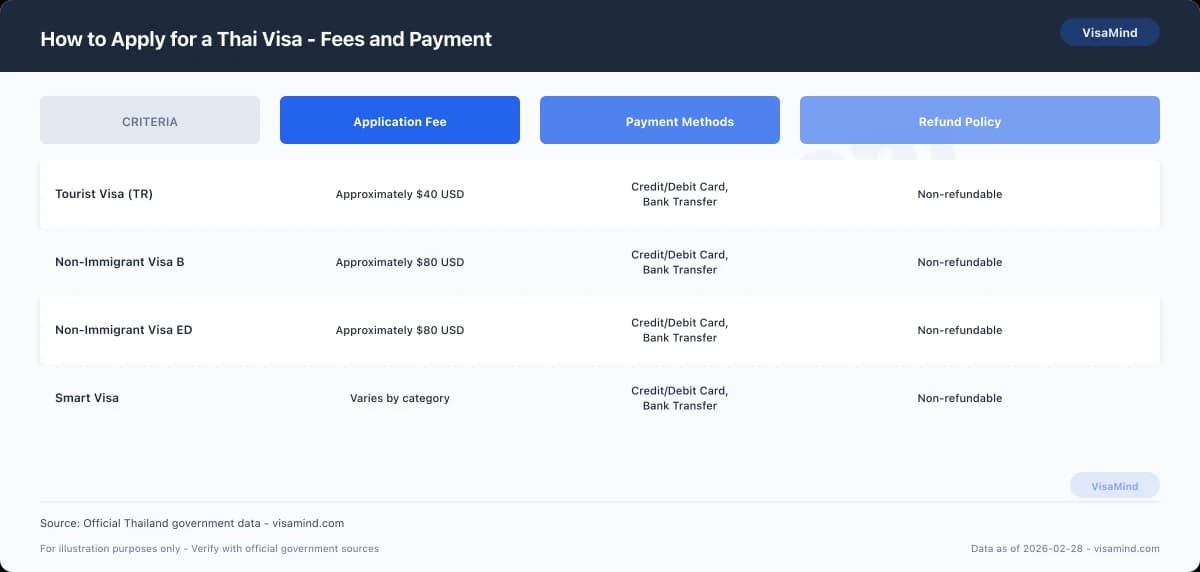
The fees for applying for a Thai visa depend on the visa category and duration. Here is a general breakdown of some common visa types and their fees:
| Visa Type | Single Entry Fee | Multiple Entry Fee |
|---|---|---|
| Tourist Visa (TR) | $40 USD | $200 USD |
| Non-Immigrant Visa B | $80 USD | $200 USD |
| Non-Immigrant Visa ED | $80 USD | $200 USD |
Important: Fees are subject to change, so verify the latest amounts on the official Thai e-Visa website.
Are There Additional Surcharges?
While the standard fees cover most application costs, there may be additional surcharges depending on the service used. For instance, if you opt for express processing, there might be an extra charge. Keep an eye out for these potential costs when planning your budget.
How Can You Pay the Fees?
Thailand's visa application fees are typically paid online through the Thai e-Visa platform. Accepted payment methods include:
- Credit and debit cards
- Digital payment services (such as PayPal)
Ensure you have a valid payment method ready to avoid delays in the application process.
Is There a Refund Policy?
Unfortunately, visa application fees are non-refundable. If your application is denied or you decide not to proceed, you will not receive a refund. Thus, it's crucial to carefully review all requirements and eligibility criteria before proceeding with your application.
Tip: Double-check all your documents using the Documents Checklist to minimize the chance of errors that could lead to denial.
By understanding these costs and policies, you can better prepare for your application process, ensuring you have the necessary funds and understanding of the payment procedures.
Tracking Your Application
#Once you've submitted your Thai visa application through the Thai e-Visa website, you might wonder how to track its progress and what to expect during the waiting period. Here's a comprehensive guide to understanding the process of tracking your application and managing the waiting time effectively.
How to Track Your Application
After you've lodged your application, tracking its progress is straightforward. The Ministry of Foreign Affairs of the Kingdom of Thailand provides an online tracking tool that allows you to monitor your application status. To access this:
-
Log in to your account on the Thai e-Visa portal.
-
Navigate to the 'Application Status' section.
-
Enter your application reference number.
You will be able to see updates regarding your application status, whether it's under review, approved, or requires additional information.
Tip: Regularly check your email for any communication from the Immigration Bureau or the Ministry of Foreign Affairs, as they may request further documentation or provide updates on your application.
Expected Timeline
The processing time for a Thai e-Visa can vary depending on the type of visa and the volume of applications. Typically, it takes about 5 to 15 business days for most visa categories, such as the Tourist Visa (TR) or Non-Immigrant Visa B (Business/Work).
Here's a quick reference table for common visa types:
| Visa Type | Processing Time |
|---|---|
| Tourist Visa (TR) | 5-10 business days |
| Non-Immigrant Visa B (Business/Work) | 10-15 business days |
| Non-Immigrant Visa ED (Education) | 5-15 business days |
Important: Processing times can fluctuate, especially during peak travel seasons. Always verify the most current timelines on the official website.
What to Do While Waiting
While your application is being processed, there are several productive steps you can take:
- Prepare for Arrival: Review the Documents Checklist to ensure you have everything ready for your trip.
- Research Your Destination: Familiarize yourself with Thailand's culture and local travel tips.
- Plan Your Stay: Whether you're coming for business, study, or tourism, use this time to arrange accommodations and activities.
In the event of any delays or complications, refer to our Visa Refusal Reasons guide for insights on potential issues and solutions.
By staying proactive and informed, you can make the most of the waiting period and ensure a smooth transition once your visa is approved.
If Something Goes Wrong
#If something goes wrong during your Thai visa application process, it's important to know your options for appeal, reapplication, and administrative review. Ensuring you have the correct documentation and understanding the potential pitfalls can save you time and stress.
What to Do if Your Application is Rejected
If your visa application is rejected, don't panic. The Immigration Bureau of Thailand allows for appeals and reapplications. Here are the steps you can take:
- Review the Rejection Letter: Carefully read the rejection notice to understand the reasons. Common reasons include incomplete applications or missing documents.
- Gather Additional Evidence: If you believe the rejection was due to missing or incomplete documentation, gather the necessary documents before reapplying.
- Consider Reapplication: After addressing the issues noted in the rejection, you can reapply. Ensure all documents are complete and accurate this time.
Tip: Consult the Visa Refusal Reasons guide to better understand common pitfalls and how to avoid them in your reapplication.
Administrative Review Process
If you believe there has been a mistake or oversight in the handling of your application, you can request an administrative review. This process is managed by the Immigration Bureau.
- Requesting a Review: Submit a formal request to the Immigration Bureau. Clearly state why you believe the decision was incorrect and provide any supporting documentation.
- Timeline for Review: Administrative reviews can take several weeks. Check the Processing Times guide for the most up-to-date information.
Rights to Appeal
In some cases, you may have the right to appeal a visa decision. This is typically available if there was a procedural error during the application process.
- Appeal Submission: Appeals must be submitted within a specific timeframe, often within 30 days of receiving the rejection notice. Verify the exact deadline on the official Immigration Bureau website.
- Legal Assistance: Consider consulting with a legal expert familiar with Thai immigration law to assist with your appeal.
Important: Missing the appeal deadline may limit your options, so act promptly if you intend to appeal.
By understanding these processes and preparing accordingly, you can navigate any setbacks in your Thai visa application journey.
Expected Timeline
#Important: Ensure you are outside of Thailand before beginning your e-Visa application, as applications submitted within the country will not be processed.
What is the Thai e-Visa Timeline?
When applying for a Thai e-Visa, understanding the expected timeline can help you plan your travel accordingly. The process is mainly handled online, allowing you to apply without physically visiting a Thai Embassy or Consulate. Here’s a summary of the typical timeline for the e-Visa process:
| Stage | Description | Timeline |
|---|---|---|
| Account Creation | Create an account on the Thai e-Visa website to begin the process. | Immediate |
| Application Submission | Fill in the online application form and upload the required documents. | 1-2 Days |
| Payment | Pay the visa fee through the online portal. | Immediate upon submission |
| Processing | Wait for the application to be processed by the Ministry of Foreign Affairs. | Approximately 3-5 Business Days |
| e-Visa Confirmation | Receive the e-Visa confirmation document via email, which you should print out for your records. | Upon completion of processing |
Tip: Apply well in advance of your intended travel date to allow sufficient time for processing and any unforeseen delays.
Considerations for Different Visa Types
Different visa types may have varying processing times. For instance, if you are applying for a Non-Immigrant Visa ED (Education) or a Smart Visa, check the specific instructions and requirements for these categories on the Non Immigrant Ed and Smart Visa pages. Each category might have unique documentation or procedural requirements that could affect the timeline.
What to Do if Delays Occur
If your application takes longer than expected, consult the Processing Times guide for insights. It's also advisable to double-check that all documents were uploaded correctly and that your application was not submitted from within Thailand. Contact the relevant Royal Thai Embassy or Consulate if further assistance is needed.
Booking Your Appointment
#1. Choose Your Appointment Location
When applying for a Thai visa, you have the option to book an appointment at either a VFS Global center or another designated visa application center. These centers handle applications submitted online through the Thai e-Visa system. Ensure you select a location that is convenient for you to visit, as you will need to present your passport and original documents in person.
2. Schedule Your Appointment Online
After submitting your online application, proceed to the VFS Global or similar center's website to book your appointment. You will need the reference number from your e-Visa application. Choose a date and time that suits your schedule. Remember to book early, as appointment slots can fill up quickly, particularly during peak travel seasons.
3. Prepare for Your Appointment
Before your appointment, gather all necessary documents, including a printed copy of your e-Visa application confirmation, passport, and any supporting documents specific to your visa category. You may need documents for various visa types, such as Non-Immigrant Visa ED (Education) or Non-Immigrant Visa O. Double-check the Documents Checklist to ensure you have everything required.
Tip: Arrive at the application center at least 15 minutes early to allow time for any security checks or additional paperwork.
4. Attend Your Appointment
On the day of your appointment, bring all your documents and be ready to provide biometric information if required. The VFS Global or similar center staff will assist you in submitting your application to the Royal Thai Embassy or Consulate-General. After your appointment, you will receive a tracking number to monitor the status of your application.
Important: If you miss your scheduled appointment, you may need to rebook, which can delay your application. Always confirm your appointment details and bring all necessary documentation to avoid setbacks.