
What to Know Before Applying
#One of the first steps is determining whether you need a visa. As of the latest update, citizens from certain countries may enter Vietnam without a visa for stays ranging from 15 to 90 days. However, if a visa is required, understanding the application process is crucial.
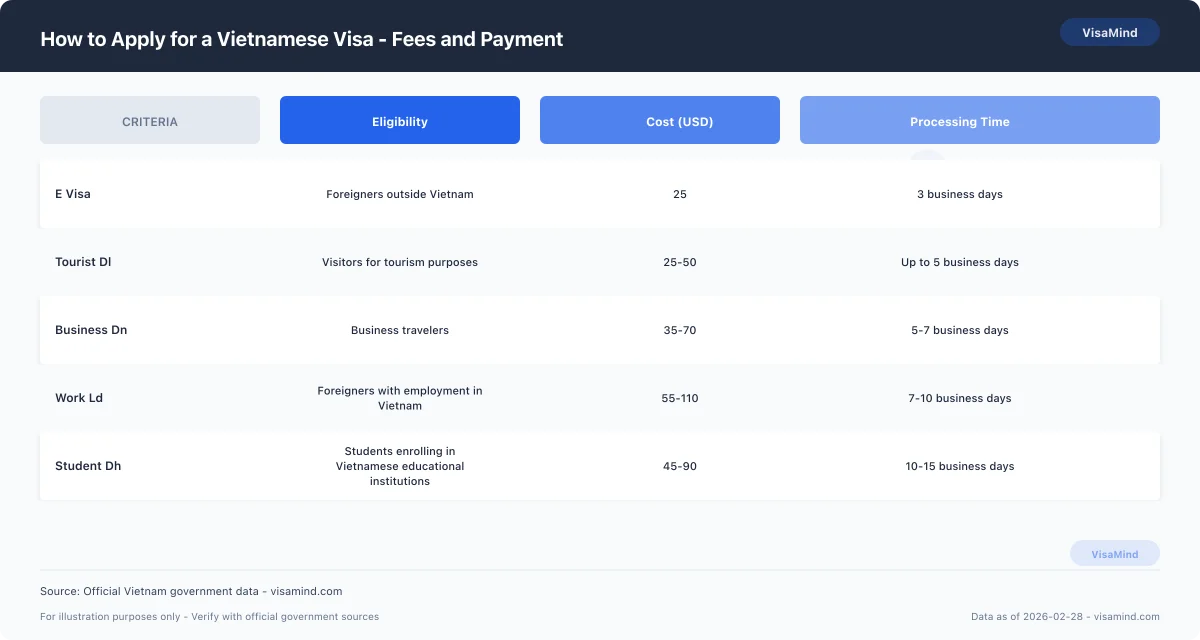
Determining the Right Visa Type
Vietnam offers several visa categories, each tailored to different purposes of entry. The most common types include:
- E-Visa: Ideal for short visits up to 30 days for tourism or business.
- Tourist Visa (DL Symbol): Suitable for those planning a vacation or visiting friends and relatives.
- Work Visa (LD Symbol): Necessary for employment purposes in Vietnam.
- Student Visa (DH Symbol): For those wishing to study at Vietnamese educational institutions.
Choosing the correct visa type is essential, as applying for the wrong category can lead to delays or rejections. For more detailed comparisons, check E Visa Vs Visa On Arrival.
Checking Eligibility
Before you begin gathering documents, verify your eligibility. Foreign nationals currently outside Vietnam are eligible to apply for an E-Visa. However, certain individuals, as specified in Clauses 1, 2, 3, and 4 of Article 8 of the 2014 Immigration Law, might be exempt from the electronic visa process and may need to apply through an inviting and sponsoring agency.
Important: Ensure that your passport is valid for at least six months from your planned entry date into Vietnam.
Gathering Required Information
Once you've confirmed your visa type and eligibility, the next step is to gather the necessary documents and information:
- Passport: A clear image of the data page is required.
- Photograph: A recent 4x6 cm image, in JPG or JPEG format, with a file size under 2MB.
- Sponsor Documents: If applicable, a notice/request from the inviting agency or organization and a copy of the ID card of the member of the relevant representative agency.
- Personal Information: Full name, date of birth, gender, and personal identification number.
Make sure all information provided is accurate and honest, as discrepancies can result in the denial of your application.
Avoiding Common Pitfalls
To ensure a smooth application process, avoid these common mistakes:
- Submitting an invalid passport photo.
- Providing false or incomplete information.
- Failing to declare all necessary details in English.
Tip: Use the Documents Checklist to ensure you have all required items before lodging your application.
By following these steps and guidelines, you can efficiently navigate the pre-application phase of obtaining a Vietnamese visa. For more specific guidance on visa types, visit the Visa On Arrival page.
The Application Process
#Determine Your Visa Type
Before beginning your application, identify the type of visa you need based on the purpose of your visit to Vietnam. Common visa categories include the E Visa for short stays, Tourist Visa (DL Symbol) for leisure travel, and Work Visa (LD Symbol) for employment. Each visa type has specific requirements and processes, so ensure you choose the right one for your situation.
Gather Required Documents
Collect all necessary documents needed for your visa application. Typically, this includes:
- A passport-sized photograph (4x6 cm) in JPEG format, under 2MB.
- An image of the passport data page.
- Documents proving legal residence.
- If applicable, a notice/request from a sponsoring agency or organization in Vietnam, along with a copy of the ID card of the representative.
Important: Ensure all information is accurate and honest to avoid application denial.
Prepare Your Application
Complete the application by entering all required information. Make sure to review and confirm your details, as inaccuracies can delay processing. For those eligible, applications can be lodged directly online through the Immigration Department of Vietnam's official portal.
Submit Your Documents
Depending on your visa type and eligibility, submit your application to the appropriate authority. This could be the Immigration Department for online submissions or other competent domestic agencies. In some cases, documents may need to be submitted to the Commune Police.
Tip: Using online services can expedite the process and offer immediate receipt confirmation.
Pay the Visa Fee
Follow the instructions to complete the payment for your visa application. Be sure to check the payment information and confirm the transaction. For e-Visa applicants, navigate to the payment section after reviewing your application.
Track Your Application
After submission, monitor the progress of your application through the official online portal. This allows you to check for any updates or additional requirements needed from the Immigration Department.
For a comprehensive list of documents needed for each visa type, refer to the Documents Checklist. If you are unsure whether an e-Visa or Visa on Arrival is right for you, consult the E Visa Vs Visa On Arrival guide for more clarity.
Fees and Payment
#
Vietnamese visa applications involve specific fees, payment methods, and refund policies. Understanding these aspects is crucial for a successful application process.
Application Fees
Visa fees for entering Vietnam vary depending on the type of visa and the duration of stay. Fees are structured as follows:
| Visa Type | Single Entry Fee | Multiple Entry Fee |
|---|---|---|
| Tourist Visa | 25 USD | 50 USD |
| Business Visa | 55 USD | 95 USD |
| E-Visa | 25 USD | N/A |
Important: These fees are subject to change. Always verify the latest fee structure on the official website of the Immigration Department of Vietnam.
Payment Methods
When applying for a Vietnamese visa, you have multiple payment options to choose from:
- Online Payment: This is the most convenient method, available for E-Visas and some other categories. Payments can be made using international credit or debit cards.
- Cash Payment: For certain visa types, especially those applied for at Vietnamese embassies or consulates, cash payments in USD or VND may be required.
- Bank Transfer: This is less common but may be available for specific visa categories. Ensure you have the correct bank details from the relevant authority.
Tip: Opt for online payment to receive a receipt number immediately, which can be useful for tracking your application status.
Refund Policy
The refund policy for Vietnamese visa applications is straightforward but strict:
- Non-refundable Fees: Visa processing fees are generally non-refundable, even if the application is denied or withdrawn.
- Exceptional Cases: Refunds might be considered in rare circumstances, such as duplicate payments or errors on the part of the Immigration Department. However, these are reviewed on a case-by-case basis.
For more detailed information on visa types, you can explore options such as E-Visa, Tourist Dl, and Visa On Arrival. Each has specific requirements and conditions that may affect both the fees and payment methods.
What Happens Next
#Once you have lodged your visa application with the Immigration Department of Vietnam, it is important to know what to expect next.
Tracking Your Application
After submitting your application, you will receive a tracking number. This allows you to monitor the progress of your visa application online. Keep this number handy as you might need to reference it if you have any inquiries about your application status. For those who applied for an E Visa, you can use the official e-visa portal for tracking.
Expected Timeline
The processing time for a Vietnamese visa typically varies depending on the type of visa and the method of application. Generally, you can expect:
- E-visa: Processing time is usually around 3 working days.
- Visa on Arrival: Generally processed within 2-4 working days after receiving the pre-approval letter.
Tip: Ensure all your documents are accurate and complete to avoid delays. For a comprehensive list of necessary documents, refer to our Documents Checklist.
What to Do While Waiting
While waiting for your visa approval, consider preparing for your trip to Vietnam. Here are a few steps you can take:
- Confirm Travel Plans: Ensure your travel itinerary aligns with the expected visa approval timeline.
- Prepare Additional Documents: If you plan to stay for an extended period, gather documents necessary for a Temporary Residence Card.
- Financial Arrangements: Consider the financial requirements for your stay as outlined in the Financial Requirements.
Handling Delays
If you experience delays beyond the expected timeline, it may be beneficial to contact the Immigration Department directly. Be prepared to provide your tracking number and any other relevant information. For more information on dealing with visa issues, consult our Visa Refusal Reasons.
By staying informed and prepared, you can ensure a smoother journey through the Vietnamese visa application process.
When Things Don't Go as Planned
#There may be instances where things don't go as planned. Understanding your options for appeal, reapplication, or administrative review can help you navigate these challenges effectively.
What If Your Visa Application Is Denied?
If your visa application is denied, it is crucial to understand the reasons behind the decision. Common pitfalls include submitting incomplete or invalid documents, providing false information, or failing to upload a valid passport photo.
Important: An e-Visa application will be denied if any dishonest information is found by the Vietnam Immigration Authority.
To address a denial, consider the following steps:
- Request Information: Reach out to the Immigration Department of Vietnam to understand the specific reasons for the denial.
- Review Documentation: Double-check all submitted documents for completeness and accuracy. Ensure all photos and information comply with the specified requirements.
- Consult the Visa Refusal Reasons guide: This can provide insight into common denial reasons and help you rectify any issues.
How to Appeal a Visa Decision
In some cases, you may have the right to appeal the decision made by the Immigration Department. An appeal involves formally requesting a review of the decision. Keep in mind:
- Timing: Submit your appeal promptly, adhering to any deadlines specified by the Immigration Department.
- Documentation: Include any additional information or documents that may support your case.
Reapplication and Administrative Review
If an appeal is not possible or unsuccessful, reapplication may be an option. Here are the key steps:
1. Correct Previous Mistakes:
Address any issues identified in the initial application. 2.
Gather Complete Documentation:
Ensure all required documents, such as a valid passport photo and sponsorship letters, are included. 3.
Consider Different Visa Types:
Explore other visa options, such as the Tourist Visa (DL Symbol) or Work Visa (LD Symbol), which may better fit your circumstances.
Tip: Consulting with an immigration expert familiar with Vietnamese procedures can provide valuable guidance for your reapplication process.
If you believe there was an administrative error, you can request an administrative review:
- Formal Request: Submit a request to the relevant authorities detailing the perceived error.
- Provide Evidence: Include any documentation that supports your claim of an administrative oversight.
Navigating visa challenges can be complex, but understanding your appeal and reapplication options can facilitate a smoother process. Always verify current requirements and procedures on the official website of the Immigration Department of Vietnam.
Timeline Overview
#To navigate the timeline for obtaining a Vietnamese visa, it's essential to understand the key steps and their respective durations. Below is a summarized overview of the timeline for different visa types to assist you in planning your travel to Vietnam.
Visa Timeline Overview
| Visa Type | Application Method | Eligibility | Timeline |
|---|---|---|---|
| E-Visa | Online through the E Visa portal | Foreigners outside Vietnam wishing to enter | Approximately 3 working days |
| Tourist Visa | Through Vietnamese embassies/consulates | Foreign tourists visiting Vietnam | 5-7 working days |
| Business Visa | Through inviting/sponsoring agencies | Business travelers with a sponsor in Vietnam | Up to 7 working days |
| Work Visa | Via employer in Vietnam | Individuals with employment in Vietnam | 5-10 working days |
| Student Visa | Through educational institutions | Students enrolled in Vietnamese institutions | 5-10 working days |
| Visa on Arrival | Pre-approval online, stamp upon entry | Applicable for travelers entering by air | Approval: 2-3 working days; Stamp: On arrival |
Important: Ensure all documents are accurate and complete. Incomplete submissions may cause delays.
Key Considerations
-
E-visa Processing: E-visas are generally processed within three working days. However, during peak travel seasons, this may extend slightly. It's advisable to apply well ahead of your planned travel date.
-
Tourist and Business Visas: Applications through embassies or consulates can take longer, depending on the specific office's processing capacity. Verify specific timelines on the official Vietnamese embassy or consulate website in your region.
-
Work and Student Visas: These visas require coordination with Vietnamese institutions or employers, which can influence processing times. Begin the application process as soon as you have confirmed your employment or enrollment.
-
Visa on Arrival: While convenient for air travelers, pre-approval is necessary before arriving in Vietnam. Ensure you have the approval letter ready to present upon entry.
For more detailed information on each visa type, consider reviewing the Visa Application Centre Visit guide.
The Online Portal
#1. Access the Official Portal
To start your Vietnamese visa application process, you need to access the official online portal managed by the Immigration Department of Vietnam. Visit the Vietnam Immigration Portal to access the application platform. Ensure you have a stable internet connection and a compatible browser for a smooth experience.
2. Create an Account
Once on the portal, you'll need to create a user account. This involves providing your email address and setting a secure password. An activation link will be sent to your email address, which you must click to verify your account. This step is crucial for tracking your application status and receiving official updates.
3. Select the Visa Type
After logging in, choose the appropriate visa type based on your purpose of visit. Options include E Visa, Tourist Visa (DL Symbol), and others. Ensure you have reviewed the requirements for each visa category to match your travel intentions.
4. Complete the Online Application
Fill in the online application form with accurate and complete personal details, passport information, and travel plans. You will need to upload a recent photograph and a scanned copy of your passport data page. Ensure these images meet the specified format and size requirements to avoid application rejection.
5. Submit Required Documents
Depending on your visa type, additional documents may be required. These could include a notice or request letter from an inviting or sponsoring agency in Vietnam. Refer to the Documents Checklist for a comprehensive list of necessary documents.
6. Pay the Visa Fee
After completing the application, proceed to the payment section. The fee varies based on the visa type, and payment is required to process your application. Ensure you review the payment details before confirming the transaction.
Important: Ensure all information provided is accurate and truthful. Any discrepancies or false information can lead to denial of your visa application.
7. Track Your Application
Use your account on the portal to monitor the status of your application. The processing time can vary, so regularly check for updates. For a better understanding of timelines, refer to the Processing Times guide.
By following these steps, you can efficiently navigate the online portal to apply for a Vietnamese visa. Always verify the most current information on the official Vietnamese Immigration portal as procedures and requirements can change.
Biometrics and Appointments
#Schedule Your Appointment
Once you have gathered the necessary documents for your Vietnamese visa application, the next step involves scheduling an appointment for biometric data collection. This is an essential part of the visa process and is usually conducted at VFS centers or the Vietnamese embassy or consulate in your country. It's important to book your appointment in advance to avoid any delays in processing your application. 2.
Attend Your Biometric Appointment
On the day of your appointment, ensure you arrive on time at the designated location. Bring all required documents, including your passport and any appointment confirmation documents. During the appointment, your biometric data, which includes fingerprints and a photograph, will be collected. This data is crucial for the Immigration Department of Vietnam to process your visa application. 3.
Follow Up on Your Application
After your biometric data has been collected, your application will be forwarded to the Immigration Department of Vietnam for further processing. You can track the status of your visa application through the respective service center or the embassy. Be sure to keep any reference numbers or receipts provided at your appointment for future inquiries. Any discrepancies or false information may lead to your visa application being denied. Always double-check the details before submission. For more information on the types of visas available, such as Work Visas or Student Visas, and to understand the differences between E-Visas vs. Visa on Arrival, explore the linked resources.
Visa Application Centre Visit
#-
Visit the VFS Global Website: To begin the process, visit the official VFS Global website or a similar visa application center webpage. This is where you will schedule your appointment for submitting your Vietnamese visa application in person.
-
Select Your Visa Type: Choose the type of visa you are applying for, such as a Work Visa (LD Symbol) or a Student Visa (DH Symbol). Make sure you have gathered all required documents for your selected visa type before proceeding.
-
Book Your Appointment: Follow the instructions on the website to book an appointment at your nearest visa application center. Ensure you select a date and time that suits your schedule, and consider allowing extra time for any unforeseen delays.
Tip: Book your appointment early, especially during peak travel seasons, to ensure availability.
Preparing for Your Appointment
-
Gather Required Documents: Ensure you have all necessary documents ready, including your passport, visa application form, and any supporting documents. Refer to the Documents Checklist for a comprehensive list of required items.
-
Prepare Your Payment: Be ready to pay any applicable fees during your appointment. Payment methods may vary, so check the center’s guidelines ahead of time.
At the Visa Application Centre
-
Arrive on Time: Ensure you arrive at the visa application center at least 15 minutes before your scheduled appointment. Punctuality is important to avoid missing your slot.
-
Submit Your Application: Present your completed application and supporting documents to the center staff. They will verify the information and guide you through the submission process.
-
Biometric Data Collection: If required, you may need to provide biometric data such as fingerprints and a photograph. This step is crucial for processing your visa application.
Important: Ensure all information provided is accurate and honest. Any discrepancies may lead to your application being denied by the Immigration Department of Vietnam.
After Your Appointment
-
Track Your Application: After submitting your application, you can track its status through the VFS Global website or the Processing Times guide. Keep your receipt and tracking number safe for future reference.
-
Wait for Notification: Once processed, you will be notified to collect your passport and visa. Ensure you check for any specific instructions provided by the visa application center.
By following these steps carefully, you can successfully navigate the appointment process for applying for a Vietnamese visa.