What to Know Before Applying
#India offers an e-Visa service for various purposes, including tourism, business, and medical visits. Before you begin, ensure your passport has at least six months of validity from the date of application. The e-Visa is non-extendable and non-convertible, so it's required to choose the correct visa type and verify your eligibility before applying. This guide will help you through the initial steps.
Choosing the Right Visa Type
India provides several categories of e-Visas based on your travel purpose. Common options include the e-Tourist Visa, e-Business Visa, and e-Medical Visa. Each type is designed for specific activities, such as leisure travel, business meetings, or medical treatment.
| Visa Type | Purpose |
|---|---|
| e-Tourist Visa | Recreation, sightseeing, visiting friends/relatives |
| e-Business Visa | Business meetings, trade, and commercial activities |
| e-Medical Visa | Medical treatment, including accompanying attendants |
Tip: Review the specific eligibility requirements for each e-Visa type on the Bureau of Immigration website.
Gathering Essential Documents
Having the right documents ready will streamline your application process. Key documents include a recent passport-size photograph with a white background and a scanned copy of your passport photo page. - Passport with at least six months of validity
- Recent photograph (white background)
- Passport photo page scan
Warning: Ensure all documents are clear and legible before uploading them, as poor-quality scans can lead to delays or rejections.
Checking Eligibility Criteria
Eligibility for an Indian e-Visa depends on the purpose of your visit. For instance, the e-Tourist Visa is suitable for travel related to recreation, sightseeing, or visiting friends and relatives.
-
Confirm your travel purpose matches the visa category you intend to apply for.
-
Verify your passport meets the six-month validity requirement.
-
Check additional criteria specific to your e-Visa type on the Bureau of Immigration website.
Important: Only travelers with valid reasons aligned with the e-Visa categories are eligible. For example, short-term yoga programs and short courses are allowed under the e-Tourist Visa.
Fees and Payment
#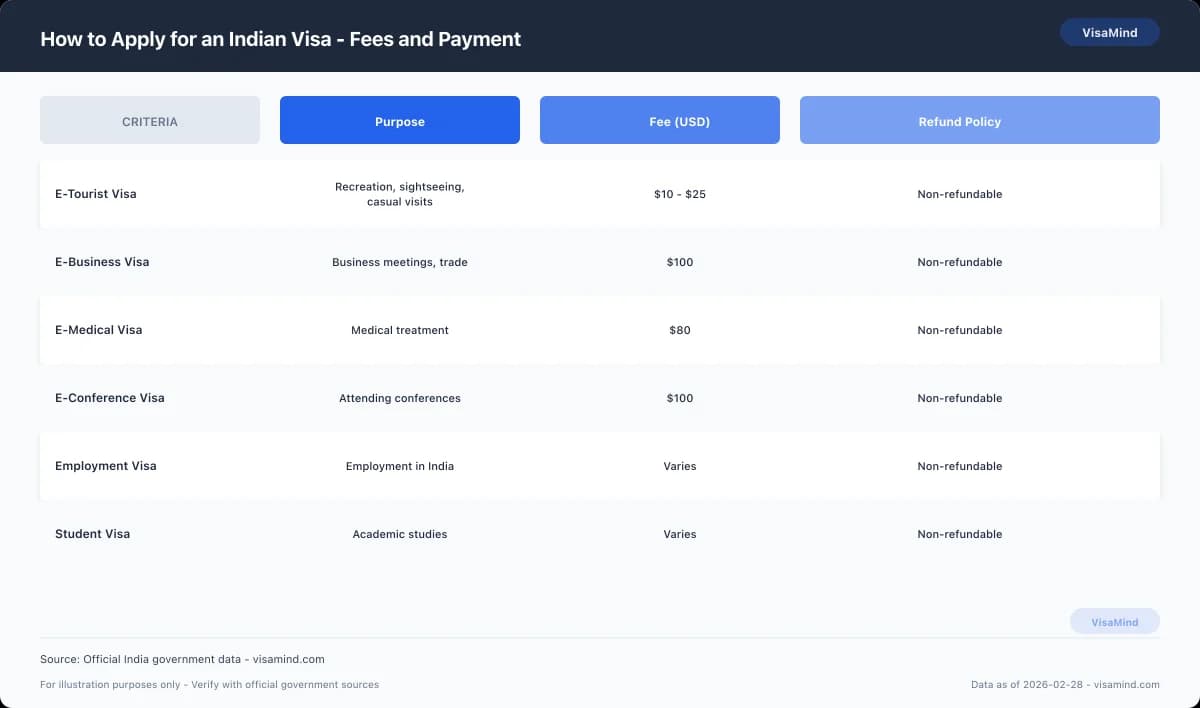
Visa application fees vary depending on the type of visa you are applying for and your nationality.
Visa Application Fees Overview
Visa fees for India are determined by the type of visa and the applicant's nationality. The e-Visa service covers a range of purposes, including tourism, business, and medical treatment. Below is a comparison of typical visa fees for some common visa types.
| Visa Type | Fee (INR) |
|---|---|
| e-Tourist Visa | ₹4,000 |
| e-Business Visa | ₹5,000 |
| e-Medical Visa | ₹2,500 |
Tip: Check the E Tourist Visa and E Business Visa pages for detailed fee structures specific to your nationality.
Accepted Payment Methods
Payment for Indian visas can be made through various methods. It's key to use a method that is accepted by the Indian visa authorities to avoid any delays. - Credit/Debit Cards
- Net Banking
- UPI (Unified Payment Interface)
Important: Ensure your payment method is enabled for international transactions to avoid payment failures.
Refund Policy and Conditions
The Indian visa application fee is non-refundable, even if the application is denied. This policy applies to all visa types processed through the official portal.
Warning: Double-check all information provided in your application to prevent rejection due to errors, as fees are non-refundable. For more details on the types of visas and their specific requirements, refer to the Business Visa and E Medical Visa pages.
The Online Portal
#India welcomes millions of visitors annually through its e-Visa system, managed by the Bureau of Immigration. This system covers various visa categories such as e-Tourist, e-Business, and e-Medical visas, providing a convenient way to apply from anywhere in the world. To start your visa application, you'll need to access India's official online portal. This is the primary platform for processing your application and ensuring you meet all necessary requirements.
Accessing the Indian Visa Portal The Indian Visa
Online portal is the official gateway for submitting your visa application. You can find this portal by visiting the Bureau of Immigration's website. - Ensure your internet connection is stable before starting. - Have your passport ready, with at least six months of validity. - Gather all required documents, such as a recent photograph and passport photo page.
Tip: Double-check the URL to ensure you are on the official Indian Visa Online portal to avoid scams.
Online System
-
Begin by selecting the type of e-Visa you need, such as E Tourist or E Medical.
-
Fill in your personal details and upload the required documents, including a passport photo and photograph.
-
Pay the visa fee using the secure payment options available, which will be displayed in INR (₹).
-
Submit your application and note down the application ID for future reference.
Important: Once submitted, the e-Visa cannot be extended or converted. Plan your travel accordingly.
Warning: Ensure all details are accurate before submission, as errors may lead to delays or rejection.
Timeline Overview
#Applying for an Indian e-Visa can be completed entirely online, often within a few days. This convenient option is available for tourists, business visitors, and medical patients among others. The application process for an Indian visa involves several key stages, each with its own timeline and requirements. Understanding these can help you plan your travel effectively.
Application Processing Timeframe
The standard processing time for an Indian e-Visa is typically 72 hours. However, it is advisable to apply at least four days before your intended travel date to accommodate any unforeseen delays.
| Visa Type | Typical Processing Time | Application Advice |
|---|---|---|
| e-Tourist Visa | 72 hours | Apply 4 days in advance |
| e-Business Visa | 72 hours | Apply 4 days in advance |
| e-Medical Visa | 72 hours | Apply 4 days in advance |
Tip: Check the Processing Times guide for current updates on visa processing durations.
Key Milestones and Deadlines
-
Ensure your passport is valid for at least six months beyond your planned entry date into India.
-
Gather all required documents, including a recent photo and the passport photo page.
-
Submit your e-Visa application online and pay the fee in INR. - Receive e-Visa approval email within 72 hours. - Print the e-Visa approval and carry it with you to present upon arrival in India.
Important: An e-Visa cannot be extended or converted and is not valid for entry into restricted or cantonment areas. Refer to the E Tourist Vs Tourist guide for more details.
The Application Process
#India offers a streamlined e-Visa service that caters to various travel purposes such as tourism, business, and medical treatment. The Foreigners Regional Registration Office (FRRO) plays a required role in managing visa-related processes once you are in India. When applying for an Indian visa, it's essential to understand the steps involved, from filling out the application form to submitting the necessary documents. The process is designed to be efficient, ensuring international travelers can focus on their visit to India.
Filling Out the Application Form
-
Visit the official Bureau of Immigration website to begin your visa application.
-
Choose the appropriate e-Visa category that fits your travel purpose, such as e-Tourist or e-Business.
-
Ensure your passport has at least six months of validity from your planned date of arrival in India.
-
Complete the online application form by entering accurate personal and travel details.
Tip: Double-check your information on the application form to avoid any discrepancies that could delay your visa processing.
Submitting Required Documents
-
Gather all necessary documents before starting your application. This includes a recent passport-size photograph with a white background and a scanned copy of the passport's bio page.
-
Upload these documents on the application portal as per the specifications provided.
-
Prepare any additional documentation required for specific visa types, such as letters of invitation for business visas.
Important: Ensure all uploaded documents are clear and legible to avoid any delays in processing.
Reviewing and Finalizing
-
Review your completed application form thoroughly to confirm all details are correct.
-
Once satisfied, proceed to pay the visa fee using the available payment options on the portal.
-
After successful payment, submit your application. You will receive an Application ID which you should keep for future reference.
Warning: The e-Visa is non-extendable and non-convertible. It is not valid for visiting Protected/Restricted and Cantonment Areas in India. For more information on the types of visas available, you can explore options like the E Tourist Visa or E Business Visa.
When Things Don't Go as Planned
#In 2026, over 10 million e-Visas were issued to foreign nationals visiting India. However, not all visa applications are successful. When facing a refusal, it's important to understand your options for appeal, reapplication, and administrative review. The Foreigners Regional Registration Office (FRRO) is the authority responsible for handling visa-related processes within India. If your visa application is refused, there are specific steps you can take to address the situation.
Understanding Appeal Rights
If your Indian visa application is refused, you generally do not have the right to appeal the decision. Indian visa decisions are final and cannot be contested through a formal appeal process. However, you can address the reasons for refusal and consider reapplying.
Tip: Review the reasons for your visa refusal carefully. These details can guide you in improving your application for future submission.
Reapplying for a Visa
After a refusal, you can submit a new visa application. Ensure you address the issues highlighted in your previous application. Gathering the correct documents and information is necessary for increasing your chances of approval. - Ensure your passport has at least six months validity.
- Provide a recent front-facing photograph with a white background.
- Review the Visa Refusal Reasons guide for common pitfalls. Reapplication allows you to correct any errors or omissions from your initial attempt. It's recommended to verify the latest requirements on the Bureau of Immigration's official website.
Administrative Review Process
In certain situations, you might be eligible for an administrative review. This process involves the FRRO or Indian missions reviewing your case to check for any errors in handling the application.
-
Submit a request for an administrative review within the specified timeframe.
-
Provide any additional documentation or clarification requested by the authorities.
-
Await the outcome of the review, which will be communicated to you.
Important: Administrative reviews are not guaranteed and are generally reserved for specific circumstances, such as processing errors.
Biometrics and Appointments
#India's e-Visa service covers several categories, including e-Tourist, e-Business, and e-Medical visas, offering convenience for international travelers. The Foreigners Regional Registration Office (FRRO) is a key authority in managing immigration processes within India. Biometric collection and appointment scheduling are essential steps in the visa application process. Understanding where and how to complete these requirements is necessary for a successful application.
Locating VFS Centers in India
Visa Facilitation Services (VFS) centers are located in major cities across India, providing support for visa applications and biometric submissions. These centers act as intermediaries between applicants and the relevant immigration authorities. - New Delhi
- Mumbai
- Chennai
- Bangalore
- Kolkata
Tip: Always check the official VFS website for the exact location and operating hours of the center nearest to you.
Scheduling Embassy Appointments
Scheduling an appointment at an Indian embassy or consulate is a necessary step for certain visa types. Appointments can often be booked online through the respective embassy's website.
-
Visit the official website of the Indian embassy or consulate in your area.
-
Select the 'appointment scheduling' option.
-
Choose a convenient date and time for your appointment.
-
Receive an appointment confirmation via email.
Important: Ensure that you bring all required documents to your appointment to avoid delays in processing.
Biometric Collection Process
Biometric data collection is a mandatory step for many visa applications. This typically includes fingerprint scans and a photograph.
-
Attend your appointment at the selected VFS center.
-
Submit your fingerprints via a digital scanner.
-
Have your photograph taken for official records.
Warning: Ensure that your fingers are clean and free from any cuts or abrasions before attending your biometric appointment.
What Happens Next
#After applying for an Indian e-Visa, you can track the status using the Bureau of Immigration's online tools. This process ensures you stay informed about your application's progress and any required actions.
Using Visa Tracking Tools
Once you've lodged your e-Visa application, the next step is to monitor its status. The Bureau of Immigration provides an online visa tracking facility that allows you to check the progress of your application.
-
Visit the Bureau of Immigration's official website.
-
Navigate to the 'Visa Status' section.
-
Enter your application ID and passport number.
-
Review the current status and note any updates or actions required.
Important: Maintain a record of your application ID and passport number, as these are needed for status checks.
Expected Processing Timeline
The processing timeline for Indian e-Visas can vary, but most applications are processed within 4 to 7 business days. It's advisable to apply well in advance of your intended travel date.
| Visa Type | Processing Time |
|---|---|
| e-Tourist | as little as 72 hours, though some applications may take several business days |
| e-Business | 4-7 business days |
| e-Medical | 4-7 business days |
Warning: Delays can occur if documents are missing or incorrect, so ensure all requirements are met before applying.
Activities While Waiting for Approval -
Double-check your travel documents, including passport validity and itinerary. - Plan your travel itinerary and accommodations in India. - Research Indian customs and cultural norms to ensure a respectful visit.
Tip: Explore additional visa types, such as the Business Visa or Employment Visa, if your purpose of visit changes.
Visa Application Centre Visit
#India's e-Visa service covers numerous categories, making travel accessible for tourists, business professionals, and those seeking medical treatment. To finalize your visa application, a visit to a VFS Global or similar center is often required.
Booking an Appointment at VFS
-
Visit the official VFS Global website to locate the Visa Application Centre nearest to you.
-
Select a convenient date and time for your appointment.
-
Pay the necessary visa application fee online to confirm your booking.
-
Receive a confirmation email detailing your appointment specifics.
Important: Ensure your passport has at least six months of validity remaining as required for e-Visa applications.
Tip: Book your appointment well in advance to secure your preferred date and time, especially during peak travel seasons.
Preparing for Your VFS Visit -
Valid passport with at least six months of validity. - Printed copy of your appointment confirmation. - Recent passport-sized photographs, following the guidelines. - Supporting documents relevant to your visa category, such as hotel bookings or invitation letters. Prior to your visit, ensure all documents are complete and organized to facilitate a smooth process at the center. Missing documents can delay your application.
Tip: Check the E Business Visa and OCI pages for additional document requirements specific to your visa type.